

Resonance: Amory
 Go to files
Resonance Series
Resonance is a collection of Minecraft Bedrock addons built around the idea of expanding the vanilla experience with new content while keeping the original Minecraft feel intact.
The series is planned to grow into several interconnected projects, including Resonance Armory, Resonance Artifacts, Resonance Core, Resonance Structure and Resonance Biome. Each addon focuses on a different aspect of the experience while sharing the same overall visual and design direction.
Resonance Armory — Beta / WIP
Resonance Armory is the first addon in the series, focusing on new weapons, combat equipment, and related mechanics. The goal is to introduce unique and enjoyable equipment without making it feel completely out of place in vanilla Minecraft.
This addon is currently in Beta and active development, so content, mechanics, models, textures, and balance may change significantly as development continues. More content will be added over time as the Resonance ecosystem grows.
Armory Content
Below are the weapons and equipment currently available in Resonance Armory. Each piece of equipment is designed with its own combat identity, mechanics, and playstyle while staying within the overall Resonance design direction.
Smoke Club
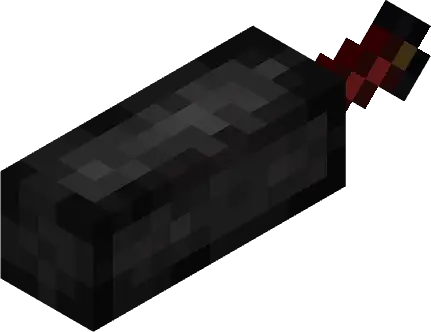
The Smoke Club is a heavy melee weapon designed around a fast 3-hit combo and battlefield disruption. Each swing can release a cloud of smoke around the first enemy struck, temporarily reducing their ability to see and move.
Unlike many heavy weapons, the Smoke Club does not knock enemies back, allowing you to keep targets within your attack range and maintain pressure.
Status: Beta / Work in Progress
Type: Melee Weapon
Weapon Class: Club
Combat Style: Combo / Crowd Control
Weapon Overview
The Smoke Club features a 3-stage attack combo. Each attack has a different range, attack arc, and damage multiplier.
The final attack deals significantly more damage than the first hit, making it useful for finishing enemies after maintaining the combo.
Base Stats
| Attribute | Value |
|---|---|
| Base Damage | 8 |
| Combo Hits | 3 |
| Attack Range | 2.3 – 2.7 blocks |
| Attack Arc | 75° – 85° |
| Knockback | None |
| Special Cooldown | 40 ticks / 2 seconds |
| Combo Reset | 40 ticks / 2 seconds |
Attack Combo
The Smoke Club has three different attack animations.
1. First Strike
The opening attack of the combo.
- Damage: 8
- Range: 2.3 blocks
- Attack Arc: 75°
- Damage Multiplier: ×1.00
- Smoke Special: Yes
The first strike is the fastest way to initiate the combo and activate the Smoke Club's special effect.
2. Second Strike
The second attack extends the weapon's effective range and increases its damage.
- Damage: 9
- Range: 2.7 blocks
- Attack Arc: 80°
- Damage Multiplier: ×1.15
- Smoke Special: Yes
The increased range makes the second strike particularly useful against enemies attempting to move away from the player.
3. Final Strike
The final attack is the strongest hit in the combo.
- Damage: 10
- Range: 2.5 blocks
- Attack Arc: 85°
- Damage Multiplier: ×1.35
- Smoke Special: Yes
The wider attack arc makes the final strike more effective against multiple enemies in front of the player.
Special Ability — Smoke Burst
Smoke Burst is the signature ability of the Smoke Club.
Whenever an attack successfully hits an enemy, the weapon can create a smoke cloud centered on the first enemy hit.
The smoke applies:
- Blindness I
- Slowness I
- Smoke particles
Effect
| Property | Value |
|---|---|
| Radius | 1.5 blocks |
| Blindness | 38 ticks (~1.9 sec) |
| Slowness | 40 ticks (2 sec) |
| Effect Level | I |
| Special Cooldown | 40 ticks (2 sec) |
The Smoke Burst is triggered once per swing and has a shared cooldown between attacks.
Important: The Smoke Club's smoke effect is triggered by a successful hit. Missing an attack does not create a smoke cloud.
Combat Mechanics
No Enemy Knockback
The Smoke Club intentionally applies no knockback to enemies.
This allows the player to remain close to targets and continue the combo without constantly pushing them out of attack range.
The player may still experience movement from the attack animation itself.
Multi-Target Attacks
Each swing can hit multiple enemies within the weapon's attack cone.
The weapon checks for up to 10 targets within the attack area.
This makes the Smoke Club effective when surrounded by groups of enemies.
Damage Breakdown
| Combo | Multiplier | Damage |
|---|---|---|
| Strike I | ×1.00 | 8 |
| Strike II | ×1.15 | 9 |
| Strike III | ×1.35 | 10 |
Maximum raw damage from one complete 3-hit combo: 27 damage per target if every strike connects.
Actual combat results may vary depending on the target's armor, effects, and other Minecraft mechanics.
Durability
Durability: 180
The Smoke Club's durability can be configured separately from its combat system.
Recommended Information
- Maximum Durability: 180
- Repair Material: Coal
Crafting Recipe
Recipe: Stick and Coal
Example format: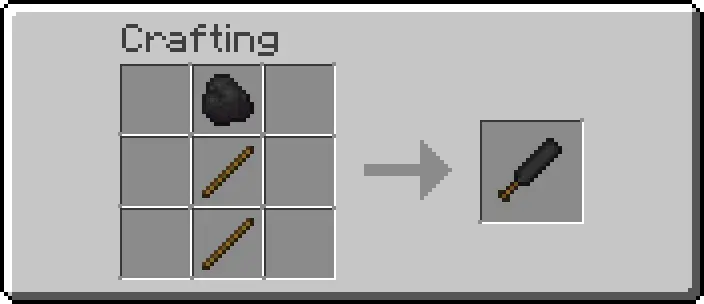
Combat Tip
The Smoke Club works best when fighting enemies at close range or when surrounded by multiple targets.
Try to maintain the combo instead of repeatedly restarting the first attack. The final strike has the highest damage and widest attack arc.
Iron Halberd
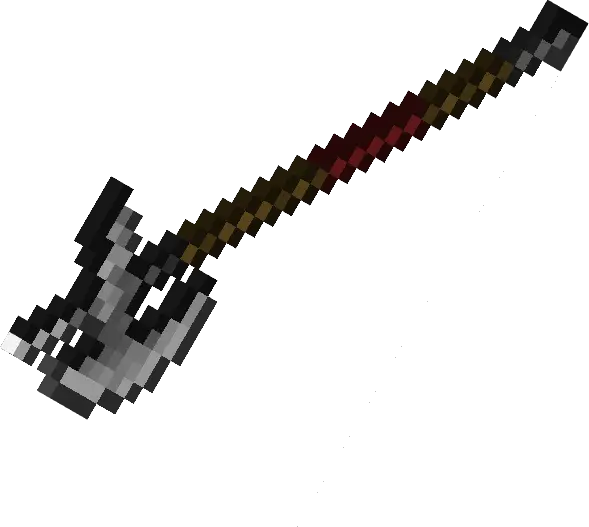
The Iron Halberd is a heavy polearm built around sweeping attacks, extended reach, and devastating strikes against armored enemies. Its damage increases based on the target's armor, making heavily equipped enemies more vulnerable to its attacks.
Every successful hit also applies strong knockback, allowing the Iron Halberd to control space and push enemies away with each swing.
Status: Beta / Work in Progress
Type: Melee Weapon
Weapon Class: Polearm
Combat Style: Combo / Armor Breaker / Knockback
Weapon Overview
The Iron Halberd features a 3-stage attack combo with a long effective range and progressively stronger attacks.
Unlike weapons that deal consistent damage regardless of the target, the Iron Halberd becomes more powerful against enemies wearing armor.
Base Stats
| Attribute | |
|---|---|
| Base Damage | 12 |
| Combo Hits | 3 |
| Attack Range | 2.8 – 3.2 blocks |
| Attack Arc | 75° – 85° |
| Knockback | Strong |
| Combo Reset | 40 ticks / 2 seconds |
Attack Combo
The Iron Halberd has three different attack animations.
1. First Strike
The opening swing of the combo, featuring the longest reach of the three attacks.
- Base Damage: 12
- Range: 3.2 blocks
- Attack Arc: 75°
- Damage Multiplier: ×1.00
- Knockback: Strong
The first strike is ideal for initiating combat from a slightly greater distance while establishing the combo.
2. Second Strike
The second attack sacrifices some range for increased damage.
- Base Damage: 13
- Range: 2.8 blocks
- Attack Arc: 80°
- Damage Multiplier: ×1.15
- Knockback: Strong
Its wider attack arc makes it useful for catching enemies attempting to move around the player.
3. Final Strike
The final attack delivers the strongest strike of the combo with a wide attack arc.
- Base Damage: 16
- Range: 3.0 blocks
- Attack Arc: 85°
- Damage Multiplier: ×1.35
- Knockback: Strong
The final strike is particularly effective against groups of armored enemies due to its high base damage and armor scaling.
Special Ability — Armor Breaker
Armor Breaker is the signature ability of the Iron Halberd.
The halberd's damage increases according to the target's armor value. The more armor an enemy has, the more damage the Iron Halberd deals.
Damage Scaling
For an unarmored target, the halberd deals its normal base damage.
Against an armored target, the damage is calculated using:
Damage = Base Damage × 1.35 + (Armor × 0.4)
This armor scaling is applied individually to every target, meaning enemies with different armor values can receive different amounts of damage from the same swing.
Armor Bonus
| Property | Value |
|---|---|
| Armor Bonus | +35% damage |
| Additional Damage | +0.4 per armor point |
| Applies To | Armored targets |
| Calculation | Per target |
For example, an enemy with 10 armor points hit by the first strike would receive:
12 × 1.35 + (10 × 0.4) = 20.2
The resulting damage is rounded down to 20 damage.
Note: The armor value used by the weapon may depend on the target's available armor data. Targets without detectable armor receive normal base damage.
Combat Mechanics
Strong Knockback
Every successful Iron Halberd hit applies strong knockback to the target.
This makes the weapon effective for controlling enemy positioning and creating distance after landing a hit.
| Knockback Property | Value |
|---|---|
| Horizontal Strength | 1.4 |
| Vertical Strength | 0.35 |
The knockback is applied in the direction the player is facing.
Multi-Target Attacks
Each swing can hit multiple enemies within the attack cone.
The weapon checks for up to 10 targets within its attack area.
Because damage is calculated individually, heavily armored enemies can receive significantly more damage than lightly armored or unarmored targets during the same attack.
Damage Breakdown
The values below represent the base damage before armor scaling.
| Combo | Multiplier | Base Damage |
|---|---|---|
| Strike I | ×1.00 | 12 |
| Strike II | ×1.15 | 13 |
| Strike III | ×1.35 | 16 |
Against armored targets, the final damage is increased by the Armor Breaker effect.
Maximum base damage from one complete 3-hit combo: 41 damage per target before armor scaling, assuming every strike connects.
Actual combat results may vary depending on the target's armor value and other Minecraft mechanics.
Durability
Durability: 325
The Iron Halberd's durability can be configured separately from its combat system.
Recommended Information
- Maximum Durability: 325
- Repair Material: Iron Ingot
Crafting Recipe
Recipe: Iron Ingots and Stick
Example format:
Combat Tip
The Iron Halberd is especially effective against heavily armored enemies.
Use its long reach to start engagements from a safe distance, then maintain the combo to take advantage of its increasing damage and wide attack arcs.
Its strong knockback can also be used to control enemy positioning, separate enemies from groups, or create breathing room during difficult encounters.
Golden Rapier
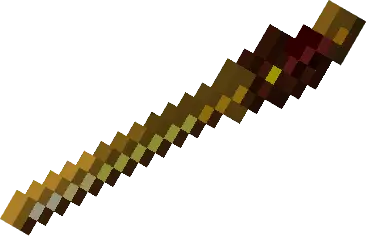
The Golden Rapier is a fast and precise melee weapon built around rapid attacks, exceptional reach, and critical strikes. Its lightweight design allows it to chain attacks quickly while maintaining an unusually long attack range.
The rapier has a 40% chance to critically strike on each attack, dealing additional damage as a separate hit. However, every critical strike consumes an additional point of durability, making its power come with a cost.
Status: Beta / Work in Progress
Type: Melee Weapon
Weapon Class: Rapier
Combat Style: Fast / Precision / Critical Hits
Weapon Overview
The Golden Rapier features a 3-stage attack combo designed around speed and reach rather than raw damage.
Each attack has a 5-block range, allowing the player to strike enemies from considerably farther away than most melee weapons.
Base Stats
| Attribute | |
|---|---|
| Base Damage | 4 |
| Combo Hits | 3 |
| Attack Range | 5 blocks |
| Attack Arc | 70° – 80° |
| Knockback | None |
| Critical Chance | 40% |
| Critical Damage | +6 |
| Combo Reset | 40 ticks / 2 seconds |
Attack Combo
The Golden Rapier has three different attack animations, each designed to maintain a fast attack tempo.
1. First Strike
The opening thrust of the combo.
- Base Damage: 4
- Range: 5 blocks
- Attack Arc: 70°
- Damage Multiplier: ×1.00
- Critical Chance: 40%
The first strike is quick and precise, making it effective for initiating combat from a distance.
2. Second Strike
The second attack increases the damage slightly while maintaining the rapier's long reach.
- Base Damage: 4
- Range: 5 blocks
- Attack Arc: 75°
- Damage Multiplier: ×1.10
- Critical Chance: 40%
Its slightly wider attack arc makes it easier to connect against moving targets.
3. Final Strike
The final attack is the strongest strike in the combo and has the widest attack arc.
- Base Damage: 5
- Range: 5 blocks
- Attack Arc: 80°
- Damage Multiplier: ×1.25
- Critical Chance: 40%
The final strike rewards players who successfully maintain the combo with increased damage and a wider attack area.
Special Ability — Critical Strike
Critical Strike is the signature ability of the Golden Rapier.
Every eligible attack has a 40% chance to trigger a critical strike.
When a critical strike occurs, the target receives an additional 6 damage as a separate damage packet.
Critical Effect
| Property | Value |
|---|---|
| Critical Chance | 40% |
| Bonus Damage | +6 |
| Damage Type | Separate Hit |
| Extra Durability | 1 point |
| Knockback | None |
The critical effect applies to all targets hit by the same attack when the critical roll succeeds.
Important: A critical strike consumes 1 additional durability point from the Golden Rapier.
This means frequent critical strikes increase the weapon's damage output while also causing it to wear down faster.
Combat Mechanics
Long Reach
The Golden Rapier has an exceptionally long 5-block attack range.
This allows the player to attack enemies before they can reach normal melee range.
Its relatively narrow attack arc, especially on the first strike, rewards accurate positioning and aiming.
No Enemy Knockback
The Golden Rapier intentionally applies no knockback to targets.
This allows the player to maintain their position relative to an enemy and continue attacking without pushing the target away.
Fast Combo
The rapier's attack animations are significantly faster than heavier weapons.
Its combo can be chained through short input windows, allowing experienced players to maintain a rapid attack rhythm.
Damage Breakdown
The values below represent the base damage before critical strikes.
| Combo | Multiplier | Base Damage | Critical Damage |
|---|---|---|---|
| Strike I | ×1.00 | 4 | +6 |
| Strike II | ×1.10 | 4 | +6 |
| Strike III | ×1.25 | 5 | +6 |
Maximum base damage from one complete 3-hit combo: 13 damage per target if every strike connects.
If all three attacks critically strike, the combo can deal an additional 18 damage, for a theoretical total of 31 damage per target.
Actual combat results may vary depending on critical strike rolls, target defenses, and other Minecraft mechanics.
Durability
Durability: 40
The Golden Rapier's critical strikes consume additional durability.
Durability Information
- Maximum Durability: 40
- Normal Attack Cost: 1 durability
- Critical Strike Cost: +1 durability / 2 durability
- Repair Material: Gold Ingot
Note: Critical strikes consume an additional durability point on top of the weapon's normal durability usage.
Crafting Recipe
Recipe: Gold Ingots and Stick
Example format: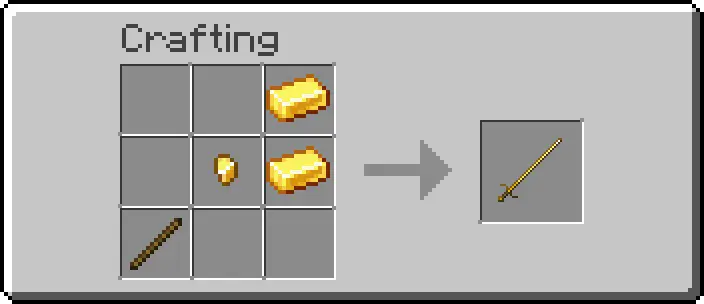
Combat Tip
The Golden Rapier rewards accuracy, aggression, and constant movement.
Use its exceptional reach to attack enemies from a safe distance, then maintain the combo to maximize your chances of triggering critical strikes.
Keep in mind that critical strikes consume additional durability. The more aggressively you chase critical hits, the faster the rapier will wear down.
Copper Hammer
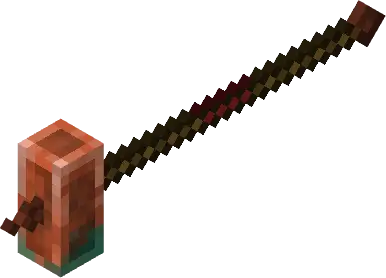
The Copper Hammer is a heavy melee weapon built around powerful combo attacks and electrical buildup. Consecutive hits gradually charge the hammer, eventually unleashing an electric shock that chains to nearby enemies.
The shock becomes stronger and reaches farther when the player or the primary target is wet, making the Copper Hammer particularly effective around water and during rain.
Status: Beta / Work in Progress
Type: Melee Weapon
Weapon Class: Hammer
Combat Style: Heavy / Combo / Chain Shock
Weapon Overview
The Copper Hammer features a 3-stage attack combo with slow, powerful swings. Its final strike deals significantly more damage than the previous attacks and has the widest attack arc.
Successful consecutive hits also build up an electrical charge that can trigger a chain shock.
Base Stats
| Attribute | |
|---|---|
| Base Damage | 12 |
| Combo Hits | 3 |
| Attack Range | 2.5 – 3.0 blocks |
| Attack Arc | 75° – 85° |
| Knockback | Slight |
| Shock Threshold | 3 consecutive hits |
| Shock Cooldown | 8 ticks / 0.4 seconds |
| Combo Reset | 40 ticks / 2 seconds |
Attack Combo
The Copper Hammer has three different attack animations.
1. First Strike
The opening swing of the combo.
- Base Damage: 12
- Range: 2.5 blocks
- Attack Arc: 75°
- Damage Multiplier: ×1.00
- Knockback: Slight
The first strike begins building the hammer's electrical charge when it successfully hits an enemy.
2. Second Strike
The second swing deals increased damage while maintaining the hammer's standard range.
- Base Damage: 13
- Range: 2.5 blocks
- Attack Arc: 80°
- Damage Multiplier: ×1.15
- Knockback: Slight
Landing consecutive hits allows the hammer to build toward its shock threshold.
3. Final Strike
The final attack is the most powerful strike in the combo.
- Base Damage: 24
- Range: 3.0 blocks
- Attack Arc: 85°
- Damage Multiplier: ×2.00
- Knockback: Slight
The final strike combines the hammer's highest damage with its widest attack arc, making it particularly effective against groups of enemies.
Special Ability — Chain Shock
Chain Shock is the signature ability of the Copper Hammer.
After 3 consecutive successful hits, the hammer can unleash an electric shock that spreads to nearby enemies around the primary target.
The shock deals additional damage independently of the hammer's normal attack damage.
Shock Effect
| Property | Normal | Wet |
|---|---|---|
| Shock Damage | 2 | 3 |
| Shock Radius | 3 blocks | 4 blocks |
| Trigger | 3 consecutive hits | 3 consecutive hits |
| Shock Cooldown | 8 ticks / 0.4 sec | 8 ticks / 0.4 sec |
The shock is considered wet when either the player or the primary target is standing in water or being exposed to rain.
When wet, the Chain Shock gains both increased damage and increased range.
Important: The primary target of the hammer strike is not damaged by the chain shock itself. The shock spreads to other nearby valid entities.
Combat Mechanics
Consecutive Hit System
The Copper Hammer tracks successful hits to build its electrical charge.
- 1st hit: Charge begins
- 2nd hit: Charge increases
- 3rd hit: Chain Shock becomes available
- Consecutive hits can maintain the streak
- The streak resets after too much time passes without a successful hit
The shock also has a short internal cooldown, preventing it from triggering repeatedly in rapid succession.
Multi-Target Attacks
Each hammer swing can hit multiple enemies within its attack cone.
The weapon checks for up to 10 targets within the attack area.
After the attack connects, the first target is used as the primary target for the Chain Shock.
Slight Knockback
The Copper Hammer applies a small amount of knockback to enemies it hits.
This gives the weapon a heavier impact without launching enemies too far away.
The player does not receive knockback from the hammer's attacks.
Damage Breakdown
The values below represent the hammer's normal attack damage before Chain Shock.
| Combo | Multiplier | Damage |
|---|---|---|
| Strike I | ×1.00 | 12 |
| Strike II | ×1.15 | 13 |
| Strike III | ×2.00 | 24 |
Maximum base damage from one complete 3-hit combo: 49 damage per target if every strike connects.
Once Chain Shock is triggered, additional nearby enemies can receive 2 extra damage, or 3 damage while wet.
Actual combat results may vary depending on target defenses and other Minecraft mechanics.
Durability
Durability: 180
The Copper Hammer's durability can be configured separately from its combat system.
Recommended Information
- Maximum Durability: 180
- Repair Material: Copper Ingot
Crafting Recipe
Recipe: Copper Ingots and Stick
Example format: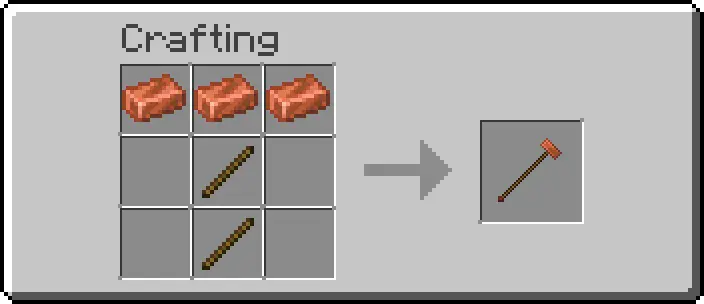
Combat Tip
The Copper Hammer becomes more dangerous when you can maintain a consecutive hit streak.
Try to land three hits without letting the combo go cold to trigger Chain Shock, then fight near water or during rain to increase the shock's damage and range.
Its slow attacks and slight knockback make positioning important, but its powerful final strike and electrical chain effect can punish groups of enemies effectively.
Diamond Greatsword
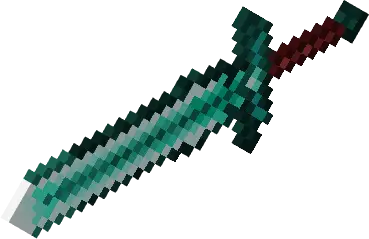
The Diamond Greatsword is a slow and heavy melee weapon built around a 3-hit combo, wide attack arcs, and a stacking Fracture mechanic. Each successful hit weakens the target's effective armor protection, allowing the Greatsword to deal increasingly more damage against heavily armored enemies.
Once Fracture reaches its maximum of 4 stacks, the next hit can trigger Shatter — a powerful burst that bypasses armor, applies Weakness II, and clears all Fracture stacks from the target.
Status: Beta / Work in Progress
Type: Melee Weapon
Weapon Class: Greatsword
Combat Style: Heavy / Combo / Armor Break / Burst Damage
Weapon Overview
The Diamond Greatsword features a 3-stage attack combo. Its attacks are slower than the other weapons in the Resonance Armory, but compensate with high damage, long range, and extremely wide attack coverage.
The weapon's signature mechanic is Fracture, which builds up on individual targets as they are repeatedly hit. Maintaining pressure on the same target eventually unlocks Shatter, providing a powerful burst of armor-bypassing damage.
Base Stats
| Attribute | Value |
|---|---|
| Base Damage | 14 |
| Combo Hits | 3 |
| Attack Range | 4.0 – 4.8 blocks |
| Attack Arc | 80° – 180° |
| Knockback | Moderate |
| Combo Reset | 40 ticks / 2 seconds |
| Fracture Stacks | 4 maximum |
| Fracture Duration | 100 ticks / 5 seconds |
| Shatter Bonus Damage | 16 |
| Shatter Cooldown | 60 ticks / 3 seconds |
Attack Combo
The Diamond Greatsword has three slow and powerful attack animations. Each successive attack increases its damage and range, with the final strike covering an exceptionally wide 180° attack arc.
1. First Strike
The opening attack of the combo.
- Damage: 14
- Range: 4.0 blocks
- Attack Arc: 80°
- Damage Multiplier: ×1.00
- Hit Frames: 31–32
- Attack Time: 55 ticks / 2.75 sec
The first strike begins building Fracture on enemies hit.
2. Second Strike
The second attack increases both the weapon's range and damage.
- Damage: 16
- Range: 4.5 blocks
- Attack Arc: 85°
- Damage Multiplier: ×1.20
- Hit Frames: 31–32
- Attack Time: 57 ticks / 2.85 sec
The increased range makes the second strike useful for maintaining pressure on targets attempting to escape.
3. Final Strike
The final attack is the strongest and widest attack in the combo.
- Damage: 21
- Range: 4.8 blocks
- Attack Arc: 180°
- Damage Multiplier: ×1.50
- Hit Frames: 31–32
- Attack Time: 60 ticks / 3 sec
The enormous attack arc allows the final strike to cover a large area around the player, making it particularly effective when several enemies are positioned nearby.
Special Ability — Fracture
Fracture is the Diamond Greatsword's primary passive ability.
Every successful swing applies 1 Fracture stack to each target hit, up to a maximum of 4 stacks per target.
Each stack reduces the target's effective armor damage reduction by 10% of its current reduction, allowing subsequent attacks to deal more damage through armor.
Fracture Effect
| Property | Value |
|---|---|
| Maximum Stacks | 4 |
| Armor Reduction Bypass | 10% per stack |
| Maximum Bypass | 40% |
| Stack Duration | 100 ticks / 5 sec |
| Stack Reset | After 5 sec without being hit |
Fracture is stored separately for each target, meaning different enemies can have different numbers of stacks at the same time.
Damage Scaling
The effective armor reduction is calculated based on the target's armor and current Fracture stacks.
At 4 Fracture stacks, the target's effective armor reduction is reduced by 40%.
For example, against a target with an estimated 80% armor damage reduction:
- 0 stacks: 80% effective reduction
- 1 stack: 72% effective reduction
- 2 stacks: 64% effective reduction
- 3 stacks: 56% effective reduction
- 4 stacks: 48% effective reduction
This allows the Greatsword to progressively become more effective against heavily armored targets.
Important: Fracture does not literally remove the target's armor. It modifies the effective damage reduction used by the Greatsword's damage calculation.
Special Ability — Shatter
Shatter is the Diamond Greatsword's burst payoff after building maximum Fracture.
When an attack hits a target that already has 4 Fracture stacks, Shatter is triggered.
The target receives:
- 16 bonus magic damage
- Weakness II
- 3 seconds of Weakness
- All Fracture stacks are cleared
The Shatter damage uses a magic damage source, allowing the bonus damage to bypass armor.
Shatter Effect
| Property | Value |
|---|---|
| Trigger | Hit target with 4 Fracture stacks |
| Bonus Damage | 16 |
| Damage Type | Magic |
| Armor Bypass | Yes |
| Weakness | Weakness II |
| Weakness Duration | 60 ticks / 3 sec |
| Fracture After Shatter | 0 stacks |
| Shatter Cooldown | 60 ticks / 3 sec |
Shatter Sequence
The intended progression is:
Hit 1 → Fracture I
Hit 2 → Fracture II
Hit 3 → Fracture III
Hit 4 → Fracture IV
Hit 5 → SHATTER
This rewards consistently focusing on the same target rather than constantly switching targets.
Important: Fracture stacks expire if the target is not hit for 5 seconds. Switching targets for too long can therefore reset the buildup.
Combat Mechanics
Heavy Knockback
The Diamond Greatsword applies moderate knockback to targets.
- Horizontal Strength: 1.2
- Vertical Strength: 0.3
This gives the weapon a noticeable impact without being as aggressive as the Iron Halberd.
Multi-Target Attacks
Each attack can hit multiple targets within its attack cone.
The targeting system checks up to 10 targets per swing.
Because Fracture is tracked individually, every target hit can build its own Fracture stacks.
Slow Attack Speed
The Greatsword has significantly longer attack animations than the faster weapons in Resonance Armory.
Its attacks take approximately:
- First Strike: 55 ticks
- Second Strike: 57 ticks
- Final Strike: 60 ticks
This makes positioning and timing especially important.
Self Movement
The Greatsword does not apply meaningful knockback to the player.
Instead, the attack includes a very small self-push for additional weight and impact feedback.
Damage Breakdown
The base damage of each combo strike is:
| Combo | Multiplier | Base Damage |
|---|---|---|
| Strike I | ×1.00 | 14 |
| Strike II | ×1.20 | 16 |
| Strike III | ×1.50 | 21 |
Maximum raw base damage from one complete 3-hit combo: 51 damage per target, before armor reduction and Fracture effects.
However, the actual damage dealt against armored targets depends on their armor and the number of existing Fracture stacks.
Shatter Damage
A successful Shatter additionally deals:
+16 magic damage
Because this damage bypasses armor, it provides a reliable burst of damage even against heavily armored targets.
Actual combat results may vary depending on armor, effects, target state, and other Minecraft mechanics.
Durability
The provided weapon source does not define a maximum durability value.
Durability: 2500
Recommended Information
- Maximum Durability: 2500
- Repair Material: Diamond
Combat Tip
The Diamond Greatsword is strongest when you commit to one target.
Build Fracture stacks while maintaining pressure, then land the next hit after reaching 4 stacks to trigger Shatter.
Its attacks are slow, so avoid swinging blindly. Take advantage of the Greatsword's long range and extremely wide final attack arc to compensate for its slower attack speed.
Against heavily armored targets, maintaining the Fracture buildup becomes especially valuable because each stack progressively reduces the effectiveness of their armor against your attacks.
Netherite Relic Blade
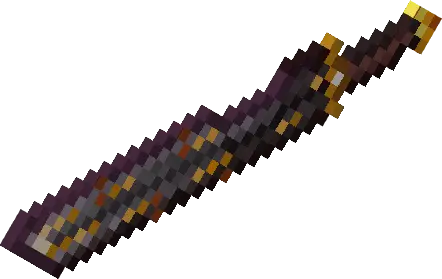
The Netherite Relic Blade is a mid-speed melee weapon built around sustained combat, enemy suppression, and gradual buildup. Each successful hit grants the player a short burst of Regeneration while applying Weakness to the target.
At the same time, repeated attacks build Burden stacks on enemies, progressively slowing them down until the fifth stack triggers a brief stun and resets the buildup.
Status: Beta / Work in Progress
Type: Melee Weapon
Weapon Class: Relic Blade
Combat Style: Sustain / Combo / Crowd Control
Weapon Overview
The Netherite Relic Blade features a 3-stage attack combo with moderate attack speed, varying ranges, and relatively controlled knockback.
Its primary mechanic combines Soul Drain and Ancient Weight. Maintaining pressure on a target allows the player to continuously refresh their sustain while making the enemy progressively slower.
Base Stats
| Attribute | Value |
|---|---|
| Base Damage | 10 |
| Combo Hits | 3 |
| Attack Range | 3.0 – 4.0 blocks |
| Attack Arc | 70° – 90° |
| Knockback | Light |
| Combo Reset | 40 ticks / 2 seconds |
| Maximum Burden | 5 stacks |
| Burden Duration | 100 ticks / 5 seconds |
Attack Combo
The Netherite Relic Blade has three attacks with different ranges and attack arcs.
The second strike has the longest range, while the final strike has the highest damage multiplier.
1. First Strike
The opening attack of the combo.
- Damage: 10
- Range: 3.0 blocks
- Attack Arc: 90°
- Damage Multiplier: ×1.00
- Hit Frame: 14
- Attack Time: 34 ticks / 1.7 sec
The first strike provides the widest attack arc of the first two attacks, making it useful for initiating combat against nearby targets.
2. Second Strike
The second attack significantly extends the weapon's reach.
- Damage: 11
- Range: 4.0 blocks
- Attack Arc: 70°
- Damage Multiplier: ×1.15
- Hit Frame: 17
- Attack Time: 35 ticks / 1.75 sec
Its longer range allows the player to keep pressure on enemies from a safer distance.
3. Final Strike
The final attack is the strongest strike in the combo.
- Damage: 14
- Range: 3.5 blocks
- Attack Arc: 80°
- Damage Multiplier: ×1.40
- Hit Frame: 17
- Attack Time: 42 ticks / 2.1 sec
The final strike takes slightly longer to execute but provides the highest raw damage of the three attacks.
Special Ability — Soul Drain
Soul Drain provides the Netherite Relic Blade with sustained combat utility.
Every successful hit grants the player Regeneration while simultaneously applying Weakness to the target.
The effect is refreshed when the combo continues without interruption.
Soul Drain Effect
| Property | Value |
|---|---|
| Player Effect | Regeneration |
| Target Effect | Weakness |
| Base Effect Duration | 40 ticks / 2 sec |
| Effect Scaling | Based on Burden stacks |
| Maximum Amplifier | II |
The effect strength increases alongside the target's Burden stacks.
The source calculates the amplifier as:
- Burden 0: Regeneration I / Weakness I
- Burden 1: Regeneration I / Weakness I
- Burden 2: Regeneration II / Weakness II
- Burden 3: Regeneration III / Weakness III
- Burden 4+: Regeneration III / Weakness III
The effect duration is refreshed to 40 ticks whenever Soul Drain activates.
Note: Minecraft effect amplifiers are zero-indexed internally. The values above describe the resulting effect levels rather than the raw amplifier values used by the code.
Special Ability — Ancient Weight
Ancient Weight is the Netherite Relic Blade's stacking crowd-control mechanic.
Each successful swing adds 1 Burden stack to each target hit, up to a maximum of 5 stacks.
As the stacks increase, the target receives progressively stronger Slowness.
Burden Effect
| Stack | Slowness | Duration |
|---|---|---|
| 1 | Slowness I | 30 ticks / 1.5 sec |
| 2 | Slowness II | 30 ticks / 1.5 sec |
| 3 | Slowness III | 30 ticks / 1.5 sec |
| 4 | Slowness IV | 30 ticks / 1.5 sec |
| 5 | Brief Stun | 16 ticks / 0.8 sec |
At 5 Burden stacks, the target receives an extremely strong Slowness effect for 16 ticks, functioning as a brief stun.
After the fifth stack triggers, all Burden stacks on that target are cleared.
Important: The fifth stack does not remain on the target. It immediately triggers the stun effect and resets Burden to 0.
Combat Mechanics
Consecutive Hit System
Burden is designed to reward repeatedly attacking the same target.
Each successful swing increases the target's Burden by one stack, while the stack timer is refreshed.
If a target is not hit for 5 seconds, its Burden stacks expire and reset.
This creates a natural progression:
Burden I → II → III → IV → V → Stun → Reset
Target-Specific Stacks
Burden is tracked individually for each target.
This means multiple enemies can have different Burden levels simultaneously.
For example:
- Enemy A → 4 stacks
- Enemy B → 2 stacks
- Enemy C → 1 stack
Continuing to hit Enemy A can trigger its stun without affecting the Burden stacks of the other enemies.
Light Knockback
The Netherite Relic Blade applies only a small amount of knockback.
- Horizontal Strength: 0.45
- Vertical Strength: 0.06
This keeps enemies relatively close to the player, helping maintain the weapon's sustained-combat playstyle.
Multi-Target Attacks
Each swing can hit multiple targets within its attack cone.
The targeting system checks up to 10 targets per attack.
Burden and Soul Drain are applied to the targets hit by the swing.
Damage Breakdown
The base damage of each combo strike is:
| Combo | Multiplier | Base Damage |
|---|---|---|
| Strike I | ×1.00 | 10 |
| Strike II | ×1.15 | 11 |
| Strike III | ×1.40 | 14 |
Maximum raw base damage from one complete 3-hit combo: 35 damage per target, before armor reduction and other Minecraft combat mechanics.
Soul Drain and Ancient Weight do not directly increase the weapon's base damage. Instead, they provide sustain and crowd control, allowing the Relic Blade to become more effective during prolonged engagements.
Actual combat results may vary depending on the target's armor, effects, and other Minecraft mechanics.
Durability
The provided weapon source does not define a maximum durability value.
Durability: 3500
Recommended Information
- Maximum Durability: 3500
- Repair Material: Netherite Ingot
Combat Tip
The Netherite Relic Blade is designed for prolonged engagements rather than burst damage.
Keep attacking the same target to build Burden and gradually restrict its movement. As the stacks increase, Soul Drain also becomes stronger, giving you better sustain while weakening your opponent.
Once Burden reaches 5 stacks, the target is briefly stunned and the buildup resets, giving you an opportunity to reposition or continue the combo.
The key to the Relic Blade is simple: the longer you maintain pressure, the heavier the enemy becomes.
Redstone Pulse Gauntlet
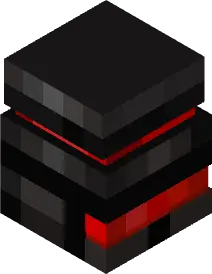
The Redstone Pulse Gauntlet is a fast melee fist weapon built around momentum, rapid combos, and stored energy. Instead of relying on raw damage alone, the Gauntlet rewards players who can maintain a complete 3-hit combo without missing.
Successfully completing a combo gradually activates Overclock, increasing the weapon's combat speed across subsequent cycles. Meanwhile, Capacitor stores energy when the player stops attacking, allowing the next successful hit to release an additional burst of damage.
Status: Beta / Work in Progress
Type: Melee Weapon
Weapon Class: Gauntlet
Combat Style: Fast / Combo / Momentum / Burst Damage
Weapon Overview
The Redstone Pulse Gauntlet features a 3-stage attack combo with three different Overclock levels.
The weapon starts in its Normal Cycle. Successfully connecting all three attacks upgrades the next cycle to Fast, while completing another perfect cycle upgrades it to Max Overclock.
Breaking the chain while Overclock is active causes a Short Circuit, temporarily slowing and weakening the player.
Base Stats
| Attribute | Value |
|---|---|
| Base Damage | 7 |
| Combo Hits | 3 |
| Attack Range | 2.0 – 2.8 blocks |
| Attack Arc | 76° – 86° |
| Knockback | Light |
| Combo Reset | 40 ticks / 2 seconds |
| Overclock Tiers | 3 |
| Capacitor Idle Time | 40 ticks / 2 seconds |
| Capacitor Bonus Damage | +10 |
Attack Combo
The Redstone Pulse Gauntlet has three different attack cycles:
- Normal
- Fast Overclock
- Max Overclock
The current Overclock tier is locked for the active cycle, meaning the animations do not change in the middle of an ongoing 3-hit combo.
Normal Cycle
The starting attack cycle of the Gauntlet.
1. First Strike
- Damage: 7
- Range: 2.0 blocks
- Attack Arc: 76°
- Damage Multiplier: ×1.00
- Hit Frame: 21
- Attack Time: 38 ticks / 1.9 sec
2. Second Strike
- Damage: 7
- Range: 2.0 blocks
- Attack Arc: 80°
- Damage Multiplier: ×1.10
- Hit Frame: 17
- Attack Time: 38 ticks / 1.9 sec
3. Final Strike
- Damage: 8
- Range: 2.2 blocks
- Attack Arc: 84°
- Damage Multiplier: ×1.25
- Hit Frame: 16
- Attack Time: 36 ticks / 1.8 sec
Normal Cycle Total: 22 damage
Special Ability — Overclock
Overclock is the Redstone Pulse Gauntlet's primary momentum mechanic.
A combo cycle is considered successful when all three swings connect with at least one target.
Completing a successful cycle increases the Gauntlet's Overclock tier for the next cycle.
Overclock Progression
| Tier | Cycle | Speed Effect |
|---|---|---|
| 0 | Normal | None |
| 1 | Fast | Haste effect |
| 2 | Max | Stronger Haste effect |
The first successful 3-hit combo upgrades the Gauntlet to Fast Cycle.
Completing another successful 3-hit combo upgrades it to Max Cycle.
The tier is capped at Max Overclock.
Fast Cycle
Once the first perfect combo is completed, the next cycle uses the Fast animation set.
1. Fast First Strike
- Damage: 7
- Range: 2.0 blocks
- Attack Arc: 78°
- Damage Multiplier: ×1.05
- Hit Frame: 14
- Attack Time: 38 ticks / 1.9 sec
2. Fast Second Strike
- Damage: 8
- Range: 2.0 blocks
- Attack Arc: 82°
- Damage Multiplier: ×1.15
- Hit Frame: 11
- Attack Time: 36 ticks / 1.8 sec
3. Fast Final Strike
- Damage: 9
- Range: 2.2 blocks
- Attack Arc: 86°
- Damage Multiplier: ×1.30
- Hit Frame: 11
- Attack Time: 36 ticks / 1.8 sec
Fast Cycle Total: 24 damage
Max Overclock
After successfully completing a second consecutive 3-hit cycle, the Gauntlet reaches Max Overclock.
The Max Cycle increases the range of the opening attack while maintaining the faster attack timing of the Overclock animations.
1. Max First Strike
- Damage: 7
- Range: 2.8 blocks
- Attack Arc: 80°
- Damage Multiplier: ×1.10
- Hit Frame: 11
- Attack Time: 36 ticks / 1.8 sec
2. Max Second Strike
- Damage: 8
- Range: 2.0 blocks
- Attack Arc: 82°
- Damage Multiplier: ×1.15
- Hit Frame: 11
- Attack Time: 36 ticks / 1.8 sec
3. Max Final Strike
- Damage: 9
- Range: 2.2 blocks
- Attack Arc: 86°
- Damage Multiplier: ×1.30
- Hit Frame: 11
- Attack Time: 36 ticks / 1.8 sec
Max Cycle Total: 24 damage
Important: Overclock tier changes are applied between cycles. The current 3-hit cycle keeps using the tier it started with.
Special Ability — Capacitor
Capacitor allows the Redstone Pulse Gauntlet to store energy when the player stops successfully hitting enemies.
If the player goes without a successful hit for approximately 2 seconds, the Capacitor becomes ready.
The next successful attack releases a +10 damage burst against the primary target of that attack.
Capacitor Effect
| Property | Value |
|---|---|
| Charge Condition | 40 ticks / 2 sec without a successful hit |
| Bonus Damage | +10 |
| Target | Primary target only |
| Proc Cooldown | 4 ticks / 0.2 sec |
| Damage Type | Entity Attack |
The Capacitor burst is applied separately from the weapon's normal attack damage.
Important: Capacitor does not affect every enemy hit by the attack. The additional burst is applied only to the first/primary target of the successful attack.
Combat Mechanics
Perfect Combo Requirement
Overclock only progresses when all three swings in the current cycle successfully connect.
Missing one of the three attacks prevents that cycle from being considered successful.
This makes accuracy important even though the weapon is designed around rapid attacks.
Chain Break
Once Overclock is active, failing to maintain the attack chain for more than 26 ticks causes the Gauntlet to trigger a Short Circuit.
The player then receives:
- Slowness
- Weakness
- Electrical feedback
- Camera shake
The Overclock tier is then reset back to Normal.
Short Circuit
Short Circuit is the primary drawback of Overclock.
| Property | Value |
|---|---|
| Trigger | Overclock chain breaks |
| Chain Break Time | 26 ticks / 1.3 sec |
| Slowness Duration | 60 ticks / 3 sec |
| Slowness Amplifier | 5 |
| Weakness Duration | 60 ticks / 3 sec |
| Weakness Amplifier | 1 |
| Result | Overclock reset |
This creates a risk-reward loop:
Maintain the combo → Overclock increases → Attack faster → Miss the chain → Short Circuit
Light Knockback
The Gauntlet applies only a small amount of knockback to enemies.
- Horizontal Strength: 0.35
- Vertical Strength: 0.04
This keeps targets relatively close, which helps the player maintain the rapid combo.
Multi-Target Attacks
Each attack can hit multiple targets within its attack cone.
The targeting system checks up to 10 targets per swing.
A successful swing only needs to connect with at least one target to count toward the current combo's successful-hit requirement.
Damage Breakdown
Normal Cycle
| Combo | Multiplier | Damage |
|---|---|---|
| Strike I | ×1.00 | 7 |
| Strike II | ×1.10 | 7 |
| Strike III | ×1.25 | 8 |
Total: 22 damage
Fast Cycle
| Combo | Multiplier | Damage |
|---|---|---|
| Strike I | ×1.05 | 7 |
| Strike II | ×1.15 | 8 |
| Strike III | ×1.30 | 9 |
Total: 24 damage
Max Overclock Cycle
| Combo | Multiplier | Damage |
|---|---|---|
| Strike I | ×1.10 | 7 |
| Strike II | ×1.15 | 8 |
| Strike III | ×1.30 | 9 |
Total: 24 damage
Capacitor Burst
A fully charged Capacitor adds:
+10 bonus damage
to the primary target of the next successful attack.
Therefore, a successful attack with a charged Capacitor can deal its normal attack damage plus 10 additional damage before other Minecraft combat mechanics are taken into account.
Actual combat results may vary depending on the target's armor, effects, and other Minecraft mechanics.
Durability
The provided weapon source does not define a maximum durability value.
Durability: 520
Recommended Information
- Maximum Durability: 520
- Repair Material: Redstone
Combat Tip
The Redstone Pulse Gauntlet rewards momentum and consistency.
Don't treat it like a normal weapon where every individual swing is equally important. Your real objective is to complete an entire 3-hit cycle without missing.
Once Overclock activates, keep the pressure going. Reaching Max Overclock makes the Gauntlet feel significantly faster and more aggressive.
At the same time, remember that stopping for too long can trigger Short Circuit. If you need to disengage, consider using that downtime to charge the Capacitor instead.
The ideal rhythm is:
Combo → Overclock → Faster Combo → Max Overclock → Capacitor Burst → Keep the chain alive.
Lunar Crescent
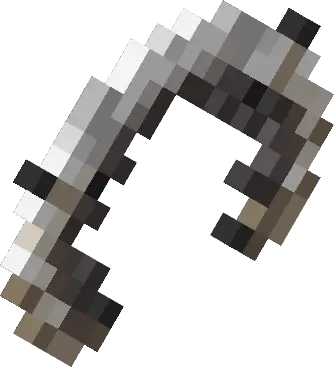
The Lunar Crescent is a returning moon-shaped melee weapon built around darkness, positioning, and controlled enemy movement. Unlike conventional weapons, its damage increases significantly under moonlight or in sufficiently dark areas.
The crescent also has a unique returning effect. After striking an enemy, the target is slowed and temporarily held in front of the player as the crescent "returns", following the player's current facing direction.
Status: Beta / Work in Progress
Type: Melee Weapon
Weapon Class: Crescent
Combat Style: Dark / Precision / Crowd Control
Weapon Overview
The Lunar Crescent uses a single attack animation rather than a traditional multi-hit combo.
Its combat identity comes from two mechanics:
- Moonlight increases damage during nighttime or in dark areas.
- Returning Crescent temporarily holds struck enemies in front of the player, allowing you to control their position while the effect is active.
Base Stats
| Attribute Value | |
|---|---|
| Base Damage | 11 |
| Attack Hits | 1 |
| Attack Range | 5 blocks |
| Attack Arc | 85° |
| Knockback | Light self-movement |
| Attack Time | 45 ticks / 2.25 sec |
| Combo Reset | 40 ticks / 2 sec |
| Moonlight Multiplier | ×1.8 |
| Dark Light Level | ≤ 7 |
Attack
The Lunar Crescent has one attack animation with a relatively long hit window.
Unlike weapons such as the Iron Halberd or Diamond Greatsword, the Lunar Crescent does not have multiple strikes or a finisher. Its strength instead comes from its range, Moonlight bonus, and returning effect.
Lunar Crescent Strike
The crescent performs a single sweeping attack.
- Damage: 11
- Moonlight Damage: 19
- Range: 5 blocks
- Attack Arc: 85°
- Damage Multiplier: ×1.00
- Hit Window: 14–25 ticks
The attack can hit multiple targets within the attack cone, with a maximum of 10 targets checked per swing.
Each target can only be damaged once per swing, even though the attack has multiple hit frames.
Special Ability — Moonlight
Moonlight is the Lunar Crescent's primary passive ability.
The weapon deals significantly increased damage when the player is fighting under either of the following conditions:
- It is nighttime.
- The player is in a dark area with a light level of 7 or lower.
Damage
| Condition | Damage |
|---|---|
| Daytime / Bright Area | 11 |
| Nighttime / Dark Area | 19 |
| Moonlight Multiplier | ×1.8 |
The damage is calculated by multiplying the base damage by 1.8, then rounding down.
Example: 11 × 1.8 = 19.8 → 19 damage
Nighttime Detection
The Lunar Crescent considers the following world-time range to be nighttime:
13,000–22,999 ticks
This covers the game's nighttime period around sunset, night, and the hours leading into sunrise.
Dark Area Detection
During daytime, Moonlight can still activate if the player's surroundings are sufficiently dark.
The weapon checks the light level around the player's:
- Feet
- Head
If the lower of those values is 7 or below, the Moonlight bonus activates.
Special Ability — Returning Crescent
After hitting an enemy, the Lunar Crescent applies its signature returning effect.
The target receives:
- Slowness II
- 20 ticks / 1 second of duration
- Temporary positional control
The target is then held approximately 3 blocks in front of the player.
Returning Effect
| Property | Value |
|---|---|
| Return Duration | 10 ticks / 0.5 sec |
| Hold Distance | 3 blocks |
| Vertical Offset | 1 block |
| Maximum Tracking Distance | 8 blocks |
| Slowness | Slowness II |
| Slowness Duration | 20 ticks / 1 sec |
The target's position follows the player's current facing direction.
This means that while the effect is active, turning the camera changes where the target is held.
Conceptually, the target behaves as though it is being positioned at approximately:
^ ^ ^3
relative to the player's current view direction.
Moon Gravity
The Lunar Crescent does not continuously knock the enemy backward.
Instead, the target's momentum is disrupted and its position is repeatedly updated toward the player's current attack direction.
This creates the feeling that the enemy is being caught by the crescent's moon-like gravity as the weapon returns.
Important: The returning effect is applied to the target that was hit. If a separate thrown crescent projectile is implemented in the resource pack, it can use the same returning logic when its hit event occurs.
Combat Mechanics
Long Attack Range
With a 5-block attack range, the Lunar Crescent can engage targets from considerably farther away than most conventional melee weapons.
Its 85° attack cone also gives it enough coverage to catch targets around the player's forward direction.
Controlled Enemy Positioning
The Returning Crescent effect is especially useful for maintaining enemies inside the player's attack range.
Instead of sending enemies away with conventional knockback:
Player → Target →→→
the Lunar Crescent temporarily creates:
Player → Target
         ↑
    held in front
This makes positioning a major part of the weapon's combat identity.
Light Self-Movement
When the attack connects, the player receives a small forward movement based on their current view direction.
The movement is intentionally light, helping the crescent feel more agile than heavy weapons such as the Greatsword or Halberd.
Multi-Target Attacks
The attack checks for up to 10 targets within the attack cone.
Each target can receive damage once during the same swing.
This allows the Lunar Crescent to affect groups of enemies while still maintaining its primary focus on positioning.
Damage Breakdown
| Condition | Base Damage | Multiplier | Final Damage |
|---|---|---|---|
| Normal | 11 | ×1.00 | 11 |
| Night / Dark Area | 11 | ×1.80 | 19 |
Because the Lunar Crescent only has one attack, there is no multi-stage combo damage to calculate.
Maximum raw damage against one target per swing: 19 damage when Moonlight is active.
Actual combat results may vary depending on the target's armor, effects, and other Minecraft mechanics.
Durability
Durability: 325
The durability value is not defined in the provided combat source.
Recommended Information
- Maximum Durability: 325
Combat Tip
The Lunar Crescent becomes significantly stronger when used under nighttime or low-light conditions.
During the day, consider fighting inside caves, structures, or other dark areas to activate Moonlight.
Use the Returning Crescent effect to keep enemies in front of you rather than pushing them away. Because the target follows your facing direction, controlling your camera becomes part of the weapon's combat technique.
For the best results, use the crescent to pull enemies into your attack space, reposition them, and keep them within its 5-block reach.
Project Notes
This addon was originally created as a way for me to experiment with addon development, document my workflow, and showcase what I can build as a developer.
My main specialization is programming and gameplay logic. The resource side of addon development—such as 3D models, textures, animations, and other visual assets—is not my primary skill set.
The friend who previously helped me with those resources in Fantasy Villagers addon is currently busy with university, so continuing the addon at the same pace is difficult. I could learn and handle the resource side myself, but that would require a significant amount of additional time to relearn and develop those skills from scratch.
Because of that, this addon should be considered a template / portfolio project rather than a finished commercial product.
Looking for Addon Development Work
If you like the systems, gameplay mechanics, or programming approach used in this addon, I am also available for freelance Minecraft Bedrock addon development.
You can:
- Hire me to develop a new addon based on your own concept.
- Ask me to continue and expand this addon with a new theme or additional content.
- Commission specific gameplay systems, mechanics, weapons, items, or other scripting features.
I primarily handle the programming, gameplay logic, systems, and implementation side of addon development. For projects requiring extensive custom models, textures, or animations, additional resource artists may be needed.
If you're interested in working together, feel free to DM me on Discord.
Support My Journey
I am currently preparing for university applications abroad, so donations and other forms of support can help cover expenses such as application fees, SAT/IELTS or other test fees, and related study-abroad costs.
If you would like to support me financially, I have provided Sociabuzz and cryptocurrency donation links below.
You can also support me without spending any money:
- CurseForge: Use the direct/no-ad link below.
- Linkvertise: If you don't mind advertisements, using the ad-supported link helps support the project without requiring you to pay anything.
All forms of support are completely optional and appreciated.
Links
Commission / Contact
- Discord Username: thenamelessone8802
Support
- Sociabuzz: https://sociabuzz.com/nameless_one/support
- Crypto: https://nowpayments.io/donation/nameless
Download / Support Links
- CurseForge — Direct / No Ads: CurseForge
- Linkvertise — Ad-supported:
Thank you for checking out this project and for supporting my work. ❤️
