Copy link
Ore Finder V1
 Go to files
The Ore Finder addon is a versatile tool designed to help Minecraft players locate ores and count blocks within a selected area.
How to Use the Ore Finder Addon:
Step-by-Step Guide:
1. Setting the Area
- Equip the Ore Finder: Hold the "Ore Finder" item in your hand.
- Select Position 1:
- Stand at one corner of the area you want to scan for ores or blocks.
- Right-click (or use the item) to set Position 1. A message will appear:
- “Position 1 set: (X, Y, Z). Use the Ore Finder again to set Position 2.”
- Select Position 2:
- Move to the opposite corner of the area.
- Right-click again to set Position 2. You’ll see:
- “Position 2 set: (X, Y, Z). Calculating block counts…”
> Note: The maximum area size is 50 blocks per axis (X, Y, Z). If the distance between Position 1 and Position 2 exceeds 100 blocks in any direction, you’ll get:
> “Error: Selected area is too large! Max distance is 100 blocks.” Reset and select a smaller area if this happens.
---
2. Finding Ores and Counting Blocks
- After setting both positions, the addon scans the area and counts all non-air blocks, including ores, between Position 1 and Position 2.
- A Block Counter Result window will display:
- A list of block types (e.g.,
stone,iron_ore,diamond_ore) and their quantities. - The total number of non-air blocks.
- Example output:
- A list of block types (e.g.,
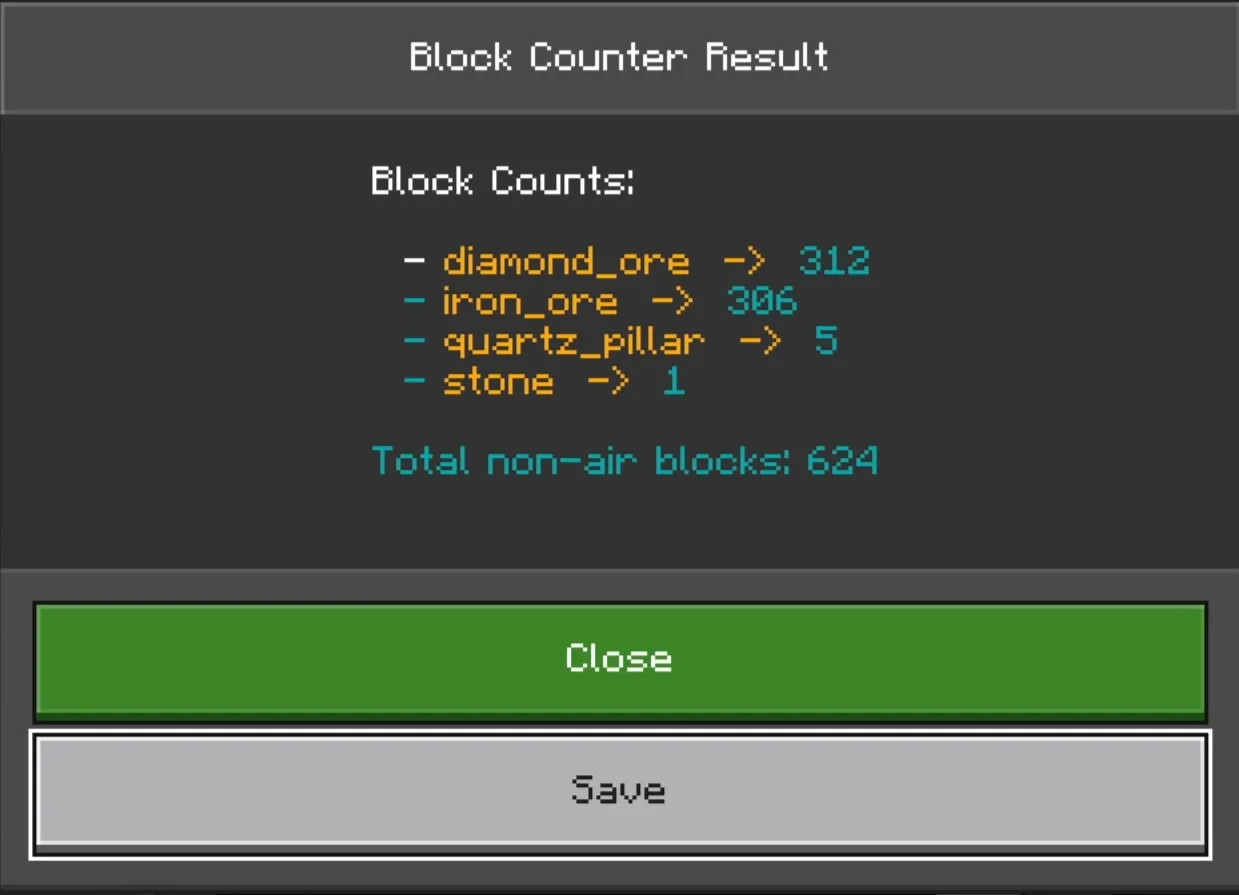
- Options:
- Save: Store the results for later (see Step 3).
- Close: Exit without saving.
---
3. Saving Your Scan
- Select Save to keep the ore and block data. A new window will ask for a name (e.g., “OrePatch1”).
- Enter a name and confirm. You’ll get a message:
- “Block counts saved as ‘OrePatch1’. Sneak and use the Ore Finder to view saved data.”
- Saved scans can be reviewed anytime (see Step 4).
---
4. Viewing Saved Scans
- Open the Menu:
- Hold the "Ore Finder" item.
- Sneak (default: Shift key) and right-click to access the Saved Block Counts menu.
- Choose a Saved Set:
- The menu lists all saved scans (e.g., “OrePatch1”, “DeepMine”).
- Click a name to view its details.
- Review Details:
- A window shows the saved ore and block counts, just like the initial results.
- Options:
- OK: Close the window.
- Remove: Delete the saved scan. Confirmation:
- “Saved data ‘OrePatch1’ has been removed.”
---
Tips & Tricks:
- Ore Hunting: Focus on underground areas (Y-levels 0-60) for the best ore finds.
- Small Scans: Use smaller areas (e.g., 10x10x10) for quicker results.
- Naming: Use clear names like “DiamondZone” or “NetherOres” to track your scans easily.
---
Troubleshooting:
- “No saved block counts found”: You haven’t saved any scans yet. Follow Step 3 to save one.
- Area Too Large: Keep the area within 50 blocks per axis to avoid errors.
- No Ores Found: Try scanning deeper underground or in a different biome.
---
With the Ore Finder addon, finding ores and managing blocks is a breeze. Dig in and explore your world like never before!
Download links
Tags